|
ejabberd is a free and open source instant messaging server written in Erlang.
ejabberd is cross-platform, distributed, fault-tolerant, and based on open standards to achieve real-time communication.
ejabberd is designed to be a rock-solid and feature rich XMPP server.
ejabberd is suitable for small deployments, whether they need to be scalable or not, as well as extremely big deployments.
ejabberd is:
Moreover, ejabberd comes with a wide range of other state-of-the-art features:
Probably the easiest way to install an ejabberd instant messaging server is using the binary installer published by ProcessOne. The binary installers of released ejabberd versions are available in the ProcessOne ejabberd downloads page: http://www.process-one.net/en/ejabberd/downloads
The installer will deploy and configure a full featured ejabberd server and does not require any extra dependencies.
In *nix systems, remember to set executable the binary installer before starting it. For example:
chmod +x ejabberd-2.0.0_1-linux-x86-installer.bin
./ejabberd-2.0.0_1-linux-x86-installer.bin
ejabberd can be started manually at any time, or automatically by the operating system at system boot time.
To start and stop ejabberd manually, use the desktop shortcuts created by the installer. If the machine doesn’t have a graphical system, use the scripts ’start’ and ’stop’ in the ’bin’ directory where ejabberd is installed.
The Windows installer also adds ejabberd as a system service, and a shortcut to a debug console for experienced administrators. If you want ejabberd to be started automatically at boot time, go to the Windows service settings and set ejabberd to be automatically started. Note that the Windows service is a feature still in development, and for example it doesn’t read the file ejabberdctl.cfg.
On a *nix system, if you want ejabberd to be started as daemon at boot time, copy ejabberd.init from the ’bin’ directory to something like /etc/init.d/ejabberd (depending on your distribution) and call /etc/inid.d/ejabberd start to start it.
If ejabberd doesn’t start correctly in Windows, try to start it using the shortcut in desktop or start menu. If the window shows error 14001, the solution is to install: "Microsoft Visual C++ 2005 SP1 Redistributable Package". You can download it from www.microsoft.com. Then uninstall ejabberd and install it again.
If ejabberd doesn’t start correctly and a crash dump is generated, there was a severe problem. You can try starting ejabberd with the script bin/live.bat in Windows, or with the command bin/ejabberdctl live in other Operating Systems. This way you see the error message provided by Erlang and can identify what is exactly the problem.
The ejabberdctl administration script is included in the bin directory. Please refer to the section 4.1 for details about ejabberdctl, and configurable options to fine tune the Erlang runtime system.
Some Operating Systems provide a specific ejabberd package adapted to the system architecture and libraries. It usually also checks dependencies and performs basic configuration tasks like creating the initial administrator account. Some examples are Debian and Gentoo. Consult the resources provided by your Operating System for more information.
Usually those packages create a script like /etc/init.d/ejabberd to start and stop ejabberd as a service at boot time.
CEAN (Comprehensive Erlang Archive Network) is a repository that hosts binary packages from many Erlang programs, including ejabberd and all its dependencies. The binaries are available for many different system architectures, so this is an alternative to the binary installer and Operating System’s ejabberd packages.
You will have to create your own ejabberd start script depending of how you handle your CEAN installation. The default ejabberdctl script is located into ejabberd’s priv directory and can be used as an example.
The canonical form for distribution of ejabberd stable releases is the source code package. Compiling ejabberd from source code is quite easy in *nix systems, as long as your system have all the dependencies.
To compile ejabberd on a ‘Unix-like’ operating system, you need:
Released versions of ejabberd are available in the ProcessOne ejabberd downloads page: http://www.process-one.net/en/ejabberd/downloads
Alternatively, the latest development version can be retrieved from the Subversion repository using this command:
svn co http://svn.process-one.net/ejabberd/trunk ejabberd
To compile ejabberd execute the commands:
./configure
make
The build configuration script allows several options. To get the full list run the command:
./configure --help
Some options that you may be interested in modifying:
To install ejabberd in the destination directories, run the command:
make install
Note that you probably need administrative privileges in the system to install ejabberd.
The files and directories created are, by default:
You can use the ejabberdctl command line administration script to start and stop ejabberd.
Usage example:
ejabberdctl start

ejabberdctl status
Node ejabberd@localhost is started. Status: started
ejabberd is running

ejabberdctl stop
If ejabberd doesn’t start correctly and a crash dump is generated, there was a severe problem. You can try starting ejabberd with the command ejabberdctl live to see the error message provided by Erlang and can identify what is exactly the problem.
Please refer to the section 4.1 for details about ejabberdctl, and configurable options to fine tune the Erlang runtime system.
The command to compile ejabberd in BSD systems is:
gmake
You need to have GNU install, but it isn’t included in Solaris. It can be easily installed if your Solaris system is set up for blastwave.org package repository. Make sure /opt/csw/bin is in your PATH and run:
pkg-get -i fileutils
If that program is called ginstall, modify the ejabberd Makefile script to suit your system, for example:
cat Makefile | sed s/install/ginstall/ > Makefile.gi
And finally install ejabberd with:
gmake -f Makefile.gi ginstall
To compile ejabberd on a Microsoft Windows system, you need:
We assume that we will try to put as much library as possible into C:\sdk\ to make it easier to track what is install for ejabberd.
C:\sdk\erl5.5.5).
C:\sdk\Expat-2.0.0
directory.Copy file C:\sdk\Expat-2.0.0\Libs\libexpat.dll
to your Windows system directory (for example, C:\WINNT or
C:\WINNT\System32)
C:\sdk\GnuWin32.Copy file C:\sdk\GnuWin32\bin\lib*.dll to your
Windows system directory (more installation instructions can be found in the
file README.woe32 in the iconv distribution).
Note: instead of copying libexpat.dll and iconv.dll to the Windows
directory, you can add the directories
C:\sdk\Expat-2.0.0\Libs and
C:\sdk\GnuWin32\bin to the PATH environment
variable.
C:\sdk\OpenSSL and add C:\sdk\OpenSSL\lib\VC to your path or copy the binaries to your system directory.
C:\sdk\gnuWin32. Copy
C:\sdk\GnuWin32\bin\zlib1.dll to your system directory. If you change your path it should already be set after libiconv install.
set PATH=%PATH%;"C:\sdk\erl5.5.5\bin"
ejabberd\src run:
configure.bat
nmake -f Makefile.win32
ejabberd\src\ejabberd.cfg and run
werl -s ejabberd -name ejabberd
You need a Jabber account and grant him administrative privileges to enter the ejabberd Web Admin:
{acl, admins, {user, "admin1", "example.org"}}.
{access, configure, [{allow, admins}]}.
You can grant administrative privileges to many Jabber accounts,
and also to accounts in other Jabber servers.
http://server:port/admin/) in your
favourite browser. Make sure to enter the full JID as username (in this
example: admin1@example.org. The reason that you also need to enter the
suffix, is because ejabberd’s virtual hosting support.
To upgrade an ejabberd installation to a new version, simply uninstall the old version, and then install the new one. Of course, it is important that the configuration file and Mnesia database spool directory are not removed.
ejabberd automatically updates the Mnesia table definitions at startup when needed. If you also use an external database for storage of some modules, check if the release notes of the new ejabberd version indicates you need to also update those tables.
The configuration file will be loaded the first time you start ejabberd. The content from this file will be parsed and stored in the internal ejabberd database. Subsequently the configuration will be loaded from the database and any commands in the configuration file are appended to the entries in the database.
Note that ejabberd never edits the configuration file. So, the configuration changes done using the Web Admin are stored in the database, but are not reflected in the configuration file. If you want those changes to be use after ejabberd restart, you can either edit the configuration file, or remove all its content.
The configuration file contains a sequence of Erlang terms. Lines beginning with a ‘%’ sign are ignored. Each term is a tuple of which the first element is the name of an option, and any further elements are that option’s values. If the configuration file do not contain for instance the ‘hosts’ option, the old host name(s) stored in the database will be used.
You can override the old values stored in the database by adding next lines to the configuration file:
override_global.
override_local.
override_acls.
With these lines the old global options (shared between all ejabberd nodes in a cluster), local options (which are specific for this particular ejabberd node) and ACLs will be removed before new ones are added.
The option hosts defines a list containing one or more domains that ejabberd will serve.
Examples:
{hosts, ["example.org"]}.
{host, "example.org"}.
{hosts, ["example.net", "example.com"]}.
Options can be defined separately for every virtual host using the host_config option. It has the following syntax:
{host_config, <hostname>, [<option>, <option>, ...]}.
Examples:
{host_config, "example.net", [{auth_method,   internal}]}.

{host_config, "example.com", [{auth_method,   ldap},
                              {ldap_servers,  ["localhost"]},
                              {ldap_uids,     [{"uid"}]},
                              {ldap_rootdn,   "dc=localdomain"},
                              {ldap_rootdn,   "dc=example,dc=com"},
                              {ldap_password, ""}]}.
{host_config, "example.net", [{auth_method, odbc},
                              {odbc_server, "DSN=ejabberd;UID=ejabberd;PWD=ejabberd"}]}.

{host_config, "example.com", [{auth_method,   ldap},
                              {ldap_servers,  ["localhost", "otherhost"]},
                              {ldap_uids,     [{"uid"}]},
                              {ldap_rootdn,   "dc=localdomain"},
                              {ldap_rootdn,   "dc=example,dc=com"},
                              {ldap_password, ""}]}.
To define specific ejabberd modules in a virtual host, you can define the global modules option with the common modules, and later add specific modules to certain virtual hosts. To accomplish that, instead of defining each option in host_config with the syntax
{<option-name>, <option-value>}
use this syntax:
{{add, <option-name>}, <option-value>}
In this example three virtual hosts have some similar modules, but there are also other different modules for some specific virtual hosts:
%% This ejabberd server has three vhosts:
{hosts, ["one.example.org", "two.example.org", "three.example.org"]}.

%% Configuration of modules that are common to all vhosts
{modules,
 [
  {mod_roster,     []},
  {mod_configure,  []},
  {mod_disco,      []},
  {mod_private,    []},
  {mod_time,       []},
  {mod_last,       []},
  {mod_version,    []}
 ]}.

%% Add some modules to vhost one:
{host_config, "one.example.org",
 [{{add, modules}, [
                    {mod_echo,       [{host, "echo-service.one.example.org"}]}
                    {mod_http_bind,  []},
                    {mod_logxml,     []}
                   ]
  }
 ]}.

%% Add a module just to vhost two:
{host_config, "two.example.org",
 [{{add, modules}, [
                    {mod_echo,       [{host, "mirror.two.example.org"}]}
                   ]
  }
 ]}.
The option listen defines for which addresses and ports ejabberd will listen and what services will be run on them. Each element of the list is a tuple with the following elements:
The available modules, their purpose and the options allowed by each one are:
This is a detailed description of each option allowed by the listening modules:
Remember that you must also install and enable the module mod_http_bind.
If HTTP Bind is enabled, it will be available at
http://server:port/http-bind/. Be aware that support for HTTP Bind
is also needed in the Jabber client. Remark also that HTTP Bind can be
interesting to host a web-based Jabber client such as
JWChat
(check the tutorials to install JWChat with ejabberd and an
embedded local web server
or Apache).
If HTTP Polling is enabled, it will be available at
http://server:port/http-poll/. Be aware that support for HTTP Polling
is also needed in the Jabber client. Remark also that HTTP Polling can be
interesting to host a web-based Jabber client such as
JWChat.
{ip, {192, 168, 1, 1}}.
{max_stanza_size, 65536}. The default
value is infinity. Recommended values are 65536 for c2s
connections and 131072 for s2s connections. s2s max stanza size
must always much higher than c2s limit. Change this value with
extreme care as it can cause unwanted disconnect if set too low.
http://server:port/admin/. Login and password are the username and
password of one of the registered users who are granted access by the
‘configure’ access rule.
There are some additional global options:
For example, the following simple configuration defines:
{hosts, ["example.com", "example.org", "example.net"]}.
{listen,
 [
  {5222, ejabberd_c2s, [
                        {access, c2s},
                        {shaper, c2s_shaper},
                        starttls, {certfile, "/etc/ejabberd/server.pem"},
                        {max_stanza_size, 65536}
                       ]},
  {5223, ejabberd_c2s, [
                        {access, c2s},
                        {shaper, c2s_shaper},
                        tls, {certfile, "/etc/ejabberd/server.pem"},
                        {max_stanza_size, 65536}
                       ]},
  {5269, ejabberd_s2s_in, [
                           {shaper, s2s_shaper},
                           {max_stanza_size, 131072}
                          ]},
  {5280, ejabberd_http, [
                         http_poll
                        ]},
  {5281, ejabberd_http, [
                         web_admin,
                         tls, {certfile, "/etc/ejabberd/server.pem"},
                        ]}
 ]
}.
{s2s_use_starttls, true}.
{s2s_certfile, "/etc/ejabberd/server.pem"}.
{domain_certfile, "example.com", "/etc/ejabberd/example_com.pem"}.
In this example, the following configuration defines that:
{acl, blocked, {user, "bad"}}.
{access, c2s, [{deny, blocked},
               {allow, all}]}.
{shaper, normal, {maxrate, 1000}}.
{access, c2s_shaper, [{none, admin},
                      {normal, all}]}.
{listen,
 [{5222, ejabberd_c2s,     [{access, c2s}, {shaper, c2s_shaper}]},
  {5223, ejabberd_c2s,     [{access, c2s},
                            ssl, {certfile, "/path/to/ssl.pem"}]},
  {5269, ejabberd_s2s_in,  []},
  {5280, ejabberd_http,    [http_poll, web_admin]},
  {5233, ejabberd_service, [{hosts, ["aim.example.org"],
                             [{password, "aimsecret"}]}]},
  {5234, ejabberd_service, [{hosts, ["icq.example.org", "sms.example.org"],
                             [{password, "jitsecret"}]}]},
  {5235, ejabberd_service, [{hosts, ["msn.example.org"],
                             [{password, "msnsecret"}]}]},
  {5236, ejabberd_service, [{hosts, ["yahoo.example.org"],
                             [{password, "yahoosecret"}]}]},
  {5237, ejabberd_service, [{hosts, ["gg.example.org"],
                             [{password, "ggsecret"}]}]},
  {5238, ejabberd_service, [{hosts, ["jmc.example.org"],
                             [{password, "jmcsecret"}]}]},
  {5239, ejabberd_service, [{hosts, ["custom.example.org"],
                             [{password, "customsecret"}]},
                            {service_check_from, false}]}
 ]
}.
{s2s_use_starttls, true}.
{s2s_certfile, "/path/to/ssl.pem"}.
{s2s_default_policy, deny}.
{{s2s_host,"jabber.example.org"}, allow}.
{{s2s_host,"example.com"}, allow}.
Note, that for jabberd 1.4- or WPJabber-based services you have to make the transports log and do XDB by themselves:
  <!--
     You have to add elogger and rlogger entries here when using ejabberd.
     In this case the transport will do the logging.
  -->

  <log id='logger'>
    <host/>
    <logtype/>
    <format>%d: [%t] (%h): %s</format>
    <file>/var/log/jabber/service.log</file>
  </log>

  <!--
     Some Jabber server implementations do not provide
     XDB services (for example, jabberd2 and ejabberd).
     xdb_file.so is loaded in to handle all XDB requests.
  -->

  <xdb id="xdb">
    <host/>
    <load>
      <!-- this is a lib of wpjabber or jabberd -->
      <xdb_file>/usr/lib/jabber/xdb_file.so</xdb_file>
      </load>
    <xdb_file xmlns="jabber:config:xdb_file">
      <spool><jabberd:cmdline flag='s'>/var/spool/jabber</jabberd:cmdline></spool>
    </xdb_file>
  </xdb>
The option auth_method defines the authentication method that is used for user authentication:
{auth_method, [<method>]}.
The following authentication methods are supported by ejabberd:
ejabberd uses its internal Mnesia database as the default authentication method.
Examples:
{host_config, "example.org", [{auth_method, [internal]}]}.
{host_config, "example.net", [{auth_method, [ldap]}]}.
{auth_method, internal}.
The anonymous authentication method can be configured with the following options. Remember that you can use the host_config option to set virtual host specific options (see section 3.1.2). Note that there also is a detailed tutorial regarding SASL Anonymous and anonymous login configuration.
Those options are defined for each virtual host with the host_config parameter (see section 3.1.2).
Examples:
{auth_method, [anonymous]}.
{anonymous_protocol, login_anon}.
{host_config, "public.example.org", [{auth_method, [anonymous]},
                                     {anonymous_protocol, login_anon}]}.
{host_config, "public.example.org", [{auth_method, [internal,anonymous]},
                                     {anonymous_protocol, login_anon}]}.
{host_config, "public.example.org", [{auth_method, [anonymous]},
                                     {anonymous_protocol, sasl_anon}]}.
{host_config, "public.example.org", [{auth_method, [anonymous]},
                                     {anonymous_protocol, both}]}.
{host_config, "public.example.org", [{auth_method, [internal,anonymous]},
                                     {anonymous_protocol, both}]}.
ejabberd supports authentication via Pluggable Authentication Modules (PAM). PAM is currently supported in AIX, FreeBSD, HP-UX, Linux, Mac OS X, NetBSD and Solaris. PAM authentication is disabled by default, so you have to configure and compile ejabberd with PAM support enabled:
./configure --enable-pam && make install
Options:
Example:
{auth_method, [pam]}.
{pam_service, "ejabberd"}.
Though it is quite easy to set up PAM support in ejabberd, PAM itself introduces some security issues:
/var/lib/ejabberd/priv/bin/
directory. You have to set it root on execution in the case when your PAM module
requires root privileges (pam_unix.so for example). Also you have to grant access
for ejabberd to this file and remove all other permissions from it.
Execute with root privileges:
chown root:ejabberd /var/lib/ejabberd/priv/bin/epam
chmod 4750 /var/lib/ejabberd/priv/bin/epam
#%PAM-1.0
auth        sufficient  pam_unix.so likeauth nullok nodelay
account     sufficient  pam_unix.so
That is not a ready to use configuration file: you must use it as a hint when building your own PAM configuration instead. Note that if you want to disable delays on authentication failures in the PAM configuration file, you have to restrict access to this file, so a malicious user can’t use your configuration to perform brute-force attacks.
Access control in ejabberd is performed via Access Control Lists (ACLs). The declarations of ACLs in the configuration file have the following syntax:
{acl, <aclname>, {<acltype>, ...}}.
<acltype> can be one of the following:
{acl, all, all}.
{acl, admin, {user, "yozhik"}}.
{acl, admin, {user, "yozhik", "example.org"}}.
{acl, exampleorg, {server, "example.org"}}.
{acl, tests, {user_regexp, "^test[0-9]*$"}}.
{acl, tests, {user_regexp, "^test", "example.org"}}.
{acl, icq, {server_regexp, "^icq\\."}}.
{acl, yohzik, {node_regexp, "^yohzik$", "^example.(com|org)$"}}.
The following ACLs are pre-defined:
An entry allowing or denying access to different services looks similar to this:
{access, <accessname>, [{allow, <aclname>},
                        {deny, <aclname>},
                        ...
                       ]}.
When a JID is checked to have access to <accessname>, the server sequentially checks if that JID matches any of the ACLs that are named in the second elements of the tuples in the list. If it matches, the first element of the first matched tuple is returned, otherwise the value ‘deny’ is returned.
Example:
{access, configure, [{allow, admin}]}.
{access, something, [{deny, badmans},
                     {allow, all}]}.
The following access rules are pre-defined:
The special access max_user_sessions specifies the maximum number of sessions (authenticated connections) per user. If a user tries to open more sessions by using different resources, the first opened session will be disconnected. The error session replaced will be sent to the disconnected session. The value for this option can be either a number, or infinity. The default value is infinity.
The syntax is:
{access, max_user_sessions, [{<maxnumber>, <aclname>},
                             ...
                            ]}.
Examples:
{access, max_user_sessions, [{10, all}]}.
The special access max_s2s_connections specifies how many simultaneus S2S connections can be established to a specific remote Jabber server. The default value is 1. There’s also available the access max_s2s_connections_per_node.
The syntax is:
{access, max_s2s_connections, [{<maxnumber>, <aclname>},
                               ...
                              ]}.
Examples:
{access, max_s2s_connections, [{3, all}]}.
Shapers enable you to limit connection traffic. The syntax of shapers is like this:
{shaper, <shapername>, <kind>}.
Currently only one kind of shaper called maxrate is available. It has the following syntax:
{maxrate, <rate>}
where <rate> stands for the maximum allowed incoming rate in bytes per second. When a connection exceeds this limit, ejabberd stops reading from the socket until the average rate is again below the allowed maximum.
Examples:
{shaper, normal, {maxrate, 1000}}.
{shaper, fast, {maxrate, 50000}}.
The option language defines the default language of server strings that can be seen by Jabber clients. If a Jabber client do not support xml:lang, the specified language is used. The default value is en. In order to take effect there must be a translation file <language>.msg in ejabberd’s msgs directory.
Examples:
{language, "ru"}.
{language, "es"}.
ejabberd uses its internal Mnesia database by default. However, it is possible to use a relational database or an LDAP server to store persistent, long-living data. ejabberd is very flexible: you can configure different authentication methods for different virtual hosts, you can configure different authentication mechanisms for the same virtual host (fallback), you can set different storage systems for modules, and so forth.
The following databases are supported by ejabberd:
The following LDAP servers are tested with ejabberd:
Important note about virtual hosting: if you define several domains in ejabberd.cfg (see section 3.1.1), you probably want that each virtual host uses a different configuration of database, authentication and storage, so that usernames do not conflict and mix between different virtual hosts. For that purpose, the options described in the next sections must be set inside a host_cofig for each vhost (see section 3.1.2). For example:
{host_config, "public.example.org", [
  {odbc_server, {pgsql, "localhost", "database-public-example-org", "ejabberd", "password"}},
  {auth_method, [odbc]}
]}.
Although this section will describe ejabberd’s configuration when you want to use the native MySQL driver, it does not describe MySQL’s installation and database creation. Check the MySQL documentation and the tutorial Using ejabberd with MySQL native driver for information regarding these topics. Note that the tutorial contains information about ejabberd’s configuration which is duplicate to this section.
Moreover, the file mysql.sql in the directory src/odbc might be interesting for you. This file contains the ejabberd schema for MySQL. At the end of the file you can find information to update your database schema.
You can skip this step if you installed ejabberd using a binary installer or if the binary packages of ejabberd you are using include support for MySQL.
./configure --enable-odbc && make install
The actual database access is defined in the option odbc_server. Its value is used to define if we want to use ODBC, or one of the two native interface available, PostgreSQL or MySQL.
To use the native MySQL interface, you can pass a tuple of the following form as parameter:
{mysql, "Server", "Database", "Username", "Password"}
mysql is a keyword that should be kept as is. For example:
{odbc_server, {mysql, "localhost", "test", "root", "password"}}.
Optionally, it is possible to define the MySQL port to use. This option is only useful, in very rare cases, when you are not running MySQL with the default port setting. The mysql parameter can thus take the following form:
{mysql, "Server", Port, "Database", "Username", "Password"}
The Port value should be an integer, without quotes. For example:
{odbc_server, {mysql, "localhost", Port, "test", "root", "password"}}.
By default ejabberd opens 10 connections to the database for each virtual host. Use this option to modify the value:
{odbc_pool_size, 10}.
You can configure an interval to make a dummy SQL request to keep alive the connections to the database. The default value is ’undefined’, so no keepalive requests are made. Specify in seconds: for example 28800 means 8 hours.
{odbc_keepalive_interval, undefined}.
If the connection to the database fails, ejabberd waits 30 seconds before retrying. You can modify this interval with this option:
{odbc_start_interval, 30}.
The option value name may be misleading, as the auth_method name is used for access to a relational database through ODBC, as well as through the native MySQL interface. Anyway, the first configuration step is to define the odbc auth_method. For example:
{auth_method, [odbc]}.
MySQL also can be used to store information into from several ejabberd modules. See section 3.3.1 to see which modules have a version with the ‘_odbc’. This suffix indicates that the module can be used with relational databases like MySQL. To enable storage to your database, just make sure that your database is running well (see previous sections), and replace the suffix-less or ldap module variant with the odbc module variant. Keep in mind that you cannot have several variants of the same module loaded!
Although this section will describe ejabberd’s configuration when you want to use Microsoft SQL Server, it does not describe Microsoft SQL Server’s installation and database creation. Check the MySQL documentation and the tutorial Using ejabberd with MySQL native driver for information regarding these topics. Note that the tutorial contains information about ejabberd’s configuration which is duplicate to this section.
Moreover, the file mssql.sql in the directory src/odbc might be interesting for you. This file contains the ejabberd schema for Microsoft SQL Server. At the end of the file you can find information to update your database schema.
You can skip this step if you installed ejabberd using a binary installer or if the binary packages of ejabberd you are using include support for ODBC.
If you want to use Microsoft SQL Server with ODBC, you need to configure, compile and install ejabberd with support for ODBC and Microsoft SQL Server enabled. This can be done, by using next commands:
./configure --enable-odbc --enable-mssql && make install
By default ejabberd opens 10 connections to the database for each virtual host. Use this option to modify the value:
{odbc_pool_size, 10}.
You can configure an interval to make a dummy SQL request to keep alive the connections to the database. The default value is ’undefined’, so no keepalive requests are made. Specify in seconds: for example 28800 means 8 hours.
{odbc_keepalive_interval, undefined}.
The configuration of Microsoft SQL Server is the same as the configuration of ODBC compatible servers (see section 3.2.4).
Microsoft SQL Server also can be used to store information into from several ejabberd modules. See section 3.3.1 to see which modules have a version with the ‘_odbc’. This suffix indicates that the module can be used with relational databases like Microsoft SQL Server. To enable storage to your database, just make sure that your database is running well (see previous sections), and replace the suffix-less or ldap module variant with the odbc module variant. Keep in mind that you cannot have several variants of the same module loaded!
Although this section will describe ejabberd’s configuration when you want to use the native PostgreSQL driver, it does not describe PostgreSQL’s installation and database creation. Check the PostgreSQL documentation and the tutorial Using ejabberd with MySQL native driver for information regarding these topics. Note that the tutorial contains information about ejabberd’s configuration which is duplicate to this section.
Also the file pg.sql in the directory src/odbc might be interesting for you. This file contains the ejabberd schema for PostgreSQL. At the end of the file you can find information to update your database schema.
You can skip this step if you installed ejabberd using a binary installer or if the binary packages of ejabberd you are using include support for PostgreSQL.
./configure --enable-odbc && make install
The actual database access is defined in the option odbc_server. Its value is used to define if we want to use ODBC, or one of the two native interface available, PostgreSQL or MySQL.
To use the native PostgreSQL interface, you can pass a tuple of the following form as parameter:
{pgsql, "Server", "Database", "Username", "Password"}
pgsql is a keyword that should be kept as is. For example:
{odbc_server, {pgsql, "localhost", "database", "ejabberd", "password"}}.
Optionally, it is possible to define the PostgreSQL port to use. This option is only useful, in very rare cases, when you are not running PostgreSQL with the default port setting. The pgsql parameter can thus take the following form:
{pgsql, "Server", Port, "Database", "Username", "Password"}
The Port value should be an integer, without quotes. For example:
{odbc_server, {pgsql, "localhost", 5432, "database", "ejabberd", "password"}}.
By default ejabberd opens 10 connections to the database for each virtual host. Use this option to modify the value:
{odbc_pool_size, 10}.
You can configure an interval to make a dummy SQL request to keep alive the connections to the database. The default value is ’undefined’, so no keepalive requests are made. Specify in seconds: for example 28800 means 8 hours.
{odbc_keepalive_interval, undefined}.
The option value name may be misleading, as the auth_method name is used for access to a relational database through ODBC, as well as through the native PostgreSQL interface. Anyway, the first configuration step is to define the odbc auth_method. For example:
{auth_method, [odbc]}.
PostgreSQL also can be used to store information into from several ejabberd modules. See section 3.3.1 to see which modules have a version with the ‘_odbc’. This suffix indicates that the module can be used with relational databases like PostgreSQL. To enable storage to your database, just make sure that your database is running well (see previous sections), and replace the suffix-less or ldap module variant with the odbc module variant. Keep in mind that you cannot have several variants of the same module loaded!
Although this section will describe ejabberd’s configuration when you want to use the ODBC driver, it does not describe the installation and database creation of your database. Check the documentation of your database. The tutorial Using ejabberd with MySQL native driver also can help you. Note that the tutorial contains information about ejabberd’s configuration which is duplicate to this section.
You can skip this step if you installed ejabberd using a binary installer or if the binary packages of ejabberd you are using include support for ODBC.
./configure --enable-odbc && make install
The actual database access is defined in the option odbc_server. Its value is used to defined if we want to use ODBC, or one of the two native interface available, PostgreSQL or MySQL.
To use a relational database through ODBC, you can pass the ODBC connection string as odbc_server parameter. For example:
{odbc_server, "DSN=database;UID=ejabberd;PWD=password"}.
By default ejabberd opens 10 connections to the database for each virtual host. Use this option to modify the value:
{odbc_pool_size, 10}.
You can configure an interval to make a dummy SQL request to keep alive the connections to the database. The default value is ’undefined’, so no keepalive requests are made. Specify in seconds: for example 28800 means 8 hours.
{odbc_keepalive_interval, undefined}.
The first configuration step is to define the odbc auth_method. For example:
{auth_method, [odbc]}.
An ODBC compatible database also can be used to store information into from several ejabberd modules. See section 3.3.1 to see which modules have a version with the ‘_odbc’. This suffix indicates that the module can be used with ODBC compatible relational databases. To enable storage to your database, just make sure that your database is running well (see previous sections), and replace the suffix-less or ldap module variant with the odbc module variant. Keep in mind that you cannot have several variants of the same module loaded!
ejabberd has built-in LDAP support. You can authenticate users against LDAP server and use LDAP directory as vCard storage. Shared rosters are not supported yet.
Note that ejabberd treats LDAP as a read-only storage: it is possible to consult data, but not possible to create accounts, change password or edit vCard that is stored in LDAP.
Parameters:
Example:
{auth_method, ldap}.
{ldap_servers, ["ldap.example.org"]}.
{ldap_port, 389}.
{ldap_rootdn, "cn=Manager,dc=domain,dc=org"}.
{ldap_password, "secret"}.
Note that current LDAP implementation does not support SSL secured communication and SASL authentication.
You can authenticate users against an LDAP directory. Available options are:
{ldap_local_filter, {notequal, {"accountStatus",["disabled"]}}}.
{ldap_local_filter, {equal, {"accountStatus",["enabled"]}}}.
{ldap_local_filter, undefined}.
Let’s say ldap.example.org is the name of our LDAP server. We have users with their passwords in "ou=Users,dc=example,dc=org" directory. Also we have addressbook, which contains users emails and their additional infos in "ou=AddressBook,dc=example,dc=org" directory. Corresponding authentication section should looks like this:
%% Authentication method
{auth_method, ldap}.
%% DNS name of our LDAP server
{ldap_servers, ["ldap.example.org"]}.
%% Bind to LDAP server as "cn=Manager,dc=example,dc=org" with password "secret"
{ldap_rootdn, "cn=Manager,dc=example,dc=org"}.
{ldap_password, "secret"}.
%% Define the user's base
{ldap_base, "ou=Users,dc=example,dc=org"}.
%% We want to authorize users from 'shadowAccount' object class only
{ldap_filter, "(objectClass=shadowAccount)"}.
Now we want to use users LDAP-info as their vCards. We have four attributes defined in our LDAP schema: "mail" — email address, "givenName" — first name, "sn" — second name, "birthDay" — birthday. Also we want users to search each other. Let’s see how we can set it up:
{modules,
 [
  ...
  {mod_vcard_ldap,
   [
    %% We use the same server and port, but want to bind anonymously because
    %% our LDAP server accepts anonymous requests to
    %% "ou=AddressBook,dc=example,dc=org" subtree.
    {ldap_rootdn, ""},
    {ldap_password, ""},
    %% define the addressbook's base
    {ldap_base, "ou=AddressBook,dc=example,dc=org"},
    %% uidattr: user's part of JID is located in the "mail" attribute
    %% uidattr_format: common format for our emails
    {ldap_uids, [{"mail", "%u@mail.example.org"}]},
    %% We have to define empty filter here, because entries in addressbook does not
    %% belong to shadowAccount object class
    {ldap_filter, ""},
    %% Now we want to define vCard pattern
    {ldap_vcard_map,
     [{"NICKNAME", "%u", []}, % just use user's part of JID as his nickname
      {"GIVEN", "%s", ["givenName"]},
      {"FAMILY", "%s", ["sn"]},
      {"FN", "%s, %s", ["sn", "givenName"]}, % example: "Smith, John"
      {"EMAIL", "%s", ["mail"]},
      {"BDAY", "%s", ["birthDay"]}]},
    %% Search form
    {ldap_search_fields,
     [{"User", "%u"},
      {"Name", "givenName"},
      {"Family Name", "sn"},
      {"Email", "mail"},
      {"Birthday", "birthDay"}]},
    %% vCard fields to be reported
    %% Note that JID is always returned with search results
    {ldap_search_reported,
     [{"Full Name", "FN"},
      {"Nickname", "NICKNAME"},
      {"Birthday", "BDAY"}]}
  ]},
  ...
 ]}.
Note that mod_vcard_ldap module checks for the existence of the user before searching in his information in LDAP.
Active Directory is just an LDAP-server with predefined attributes. A sample configuration is shown below:
{auth_method, ldap}.
{ldap_servers, ["office.org"]}.    % List of LDAP servers
{ldap_base, "DC=office,DC=org"}. % Search base of LDAP directory
{ldap_rootdn, "CN=Administrator,CN=Users,DC=office,DC=org"}. % LDAP manager
{ldap_password, "*******"}. % Password to LDAP manager
{ldap_uids, [{"sAMAccountName"}]}.
{ldap_filter, "(memberOf=*)"}.

{modules,
 [
  ...
  {mod_vcard_ldap,
   [{ldap_vcard_map,
     [{"NICKNAME", "%u", []},
      {"GIVEN", "%s", ["givenName"]},
      {"MIDDLE", "%s", ["initials"]},
      {"FAMILY", "%s", ["sn"]},
      {"FN", "%s", ["displayName"]},
      {"EMAIL", "%s", ["mail"]},
      {"ORGNAME", "%s", ["company"]},
      {"ORGUNIT", "%s", ["department"]},
      {"CTRY", "%s", ["c"]},
      {"LOCALITY", "%s", ["l"]},
      {"STREET", "%s", ["streetAddress"]},
      {"REGION", "%s", ["st"]},
      {"PCODE", "%s", ["postalCode"]},
      {"TITLE", "%s", ["title"]},
      {"URL", "%s", ["wWWHomePage"]},
      {"DESC", "%s", ["description"]},
      {"TEL", "%s", ["telephoneNumber"]}]},
    {ldap_search_fields,
     [{"User", "%u"},
      {"Name", "givenName"},
      {"Family Name", "sn"},
      {"Email", "mail"},
      {"Company", "company"},
      {"Department", "department"},
      {"Role", "title"},
      {"Description", "description"},
      {"Phone", "telephoneNumber"}]},
    {ldap_search_reported,
     [{"Full Name", "FN"},
      {"Nickname", "NICKNAME"},
      {"Email", "EMAIL"}]}
  ]},
  ...
 ]}.
The option modules defines the list of modules that will be loaded after ejabberd’s startup. Each entry in the list is a tuple in which the first element is the name of a module and the second is a list of options for that module.
Examples:
{modules,
 [
  {mod_echo,      []}
 ]}.
{modules,
 [
  {mod_echo,      []},
  {mod_time,      []},
  {mod_version,   []}
 ]}.
The following table lists all modules included in ejabberd.
Module Feature Dependencies mod_adhoc Ad-Hoc Commands (XEP-0050) mod_announce Manage announcements recommends mod_adhoc mod_caps Entity Capabilities (XEP-0115) mod_configure Server configuration using Ad-Hoc mod_adhoc mod_disco Service Discovery (XEP-0030) mod_echo Echoes Jabber packets mod_irc IRC transport mod_last Last Activity (XEP-0012) mod_last_odbc Last Activity (XEP-0012) supported DB (*) mod_muc Multi-User Chat (XEP-0045) mod_muc_log Multi-User Chat room logging mod_muc mod_offline Offline message storage (XEP-0160) mod_offline_odbc Offline message storage (XEP-0160) supported DB (*) mod_privacy Blocking Communication (XMPP IM) mod_privacy_odbc Blocking Communication (XMPP IM) supported DB (*) mod_private Private XML Storage (XEP-0049) mod_private_odbc Private XML Storage (XEP-0049) supported DB (*) mod_proxy65 SOCKS5 Bytestreams (XEP-0065) mod_pubsub Pub-Sub (XEP-0060), PEP (XEP-0163) mod_caps mod_register In-Band Registration (XEP-0077) mod_roster Roster management (XMPP IM) mod_roster_odbc Roster management (XMPP IM) supported DB (*) mod_service_log Copy user messages to logger service mod_shared_roster Shared roster management mod_roster or mod_roster_odbc mod_stats Statistics Gathering (XEP-0039) mod_time Entity Time (XEP-0090) mod_vcard vcard-temp (XEP-0054) mod_vcard_ldap vcard-temp (XEP-0054) LDAP server mod_vcard_odbc vcard-temp (XEP-0054) supported DB (*) mod_version Software Version (XEP-0092)
You can see which database backend each module needs by looking at the suffix:
If you want to, it is possible to use a relational database to store pieces of information. You can do this by changing the module name to a name with an _odbc suffix in ejabberd config file. You can use a relational database for the following data:
You can find more contributed modules on the ejabberd website. Please remember that these contributions might not work or that they can contain severe bugs and security leaks. Therefore, use them at your own risk!
The following options are used by many modules. Therefore, they are described in this separate section.
Many modules define handlers for processing IQ queries of different namespaces to this server or to a user (e. g. to example.org or to user@example.org). This option defines processing discipline for these queries. Possible values are:
Example:
{modules,
 [
  ...
  {mod_time, [{iqdisc, no_queue}]},
  ...
 ]}.
This option defines the Jabber ID of a service provided by an ejabberd module. The keyword "@HOST@" is replaced at start time with the real virtual host string.
This example configures the echo module to provide its echoing service in the Jabber ID mirror.example.org:
{modules,
 [
  ...
  {mod_echo, [{host, "mirror.example.org"}]},
  ...
 ]}.
However, if there are several virtual hosts and this module is enabled in all of them, the "@HOST@" keyword must be used:
{modules,
 [
  ...
  {mod_echo, [{host, "mirror.@HOST@"}]},
  ...
 ]}.
This module enables configured users to broadcast announcements and to set the message of the day (MOTD). Configured users can perform these actions with a Jabber client either using Ad-hoc commands or sending messages to specific JIDs.
The Ad-hoc commands are listed in the Server Discovery. For this feature to work, mod_adhoc must be enabled.
The specific JIDs where messages can be sent are listed bellow. The first JID in each entry will apply only to the specified virtual host example.org, while the JID between brackets will apply to all virtual hosts in ejabberd.
Options:
Examples:
{access, announce, [{allow, admins}]}.

{modules,
 [
  ...
  {mod_adhoc, []},
  {mod_announce, [{access, announce}]},
  ...
 ]}.
{acl, direction, {user, "big_boss", "example.org"}}.
{acl, direction, {user, "assistant", "example.org"}}.
{acl, admins, {user, "admin", "example.org"}}.

{access, announce, [{allow, admins},
                    {allow, direction}]}.

{modules,
 [
  ...
  {mod_adhoc, []},
  {mod_announce, [{access, announce}]},
  ...
 ]}.
Note that mod_announce can be resource intensive on large deployments as it can broadcast lot of messages. This module should be disabled for instances of ejabberd with hundreds of thousands users.
This module adds support for Service Discovery (XEP-0030). With this module enabled, services on your server can be discovered by Jabber clients. Note that ejabberd has no modules with support for the superseded Jabber Browsing (XEP-0011) and Agent Information (XEP-0094). Accordingly, Jabber clients need to have support for the newer Service Discovery protocol if you want them be able to discover the services you offer.
Options:
Examples:
{modules,
 [
  ...
  {mod_disco, [{extra_domains, ["users.jabber.org"]}]},
  ...
 ]}.
{modules,
 [
  ...
  {mod_disco, [{extra_domains, ["icq.example.com",
                                "msn.example.com"]}]},
  ...
 ]}.
{modules,
 [
  ...
  {mod_disco, [{extra_domains, ["example.org",
                                "example.com"]}]},
  ...
 ]}.
This module simply echoes any Jabber packet back to the sender. This mirror can be of interest for ejabberd and Jabber client debugging.
Options:
Example: Mirror, mirror, on the wall, who is the most beautiful of them all?
{modules,
 [
  ...
  {mod_echo, [{host, "mirror.example.org"}]},
  ...
 ]}.
This module is an IRC transport that can be used to join channels on IRC servers.
End user information:
Options:
Examples:
{modules,
 [
  ...
  {mod_irc, [{access, all}, {default_encoding, "iso8859-15"}]},
  ...
 ]}.
{acl, paying_customers, {user, "customer1", "example.org"}}.
{acl, paying_customers, {user, "customer2", "example.org"}}.
{acl, paying_customers, {server, "example.com"}}.

{access, irc_users, [{allow, paying_customers}, {deny, all}]}.

{modules,
 [
  ...
  {mod_irc, [{access, irc_users},
             {host, "irc.example.net"}]},
  ...
 ]}.
This module adds support for Last Activity (XEP-0012). It can be used to discover when a disconnected user last accessed the server, to know when a connected user was last active on the server, or to query the uptime of the ejabberd server.
Options:
This module provides a Multi-User Chat (XEP-0045) service. Users can discover existing rooms, join or create them. Occupants of a room can chat in public or have private chats.
Some of the features of Multi-User Chat:
The MUC service allows any Jabber ID to register a nickname, so nobody else can use that nickname in any room in the MUC service. To register a nickname, open the Service Discovery in your Jabber client and register in the MUC service.
This module supports clustering and load balancing. One module can be started per cluster node. Rooms are distributed at creation time on all available MUC module instances. The multi-user chat module is clustered but the rooms themselves are not clustered nor fault-tolerant: if the node managing a set of rooms goes down, the rooms disappear and they will be recreated on an available node on first connection attempt.
Module options:
Examples:
{acl, admin, {user, "admin", "example.org"}}.

{access, muc_admin, [{allow, admin}]}.

{modules,
 [
  ...
  {mod_muc, [{access, all},
             {access_create, all},
             {access_admin, muc_admin},
             {history_size, 0}]},
  ...
 ]}.
{acl, paying_customers, {user, "customer1", "example.net"}}.
{acl, paying_customers, {user, "customer2", "example.com"}}.
{acl, paying_customers, {user, "customer3", "example.org"}}.
{acl, admin, {user, "admin", "example.org"}}.

{access, muc_admin, [{allow, admin},
                      {deny, all}]}.
{access, muc_access, [{allow, paying_customers},
                      {allow, admin},
                      {deny, all}]}.

{modules,
 [
  ...
  {mod_muc, [{access, muc_access},
             {access_create, muc_admin},
             {access_admin, muc_admin}]},
  ...
 ]}.
{modules,
 [
  ...
  {mod_muc, [{min_message_interval, 0.4},
             {min_presence_interval, 4}]},
  ...
 ]}.
{modules,
 [
  ...
  {mod_muc, [{access, muc_access},
             {access_create, muc_admin},
             {default_room_options,
              [
               {allow_change_subj, false},
               {allow_query_users, true},
               {allow_private_messages, true},
               {members_by_default, false},
               {title, "New chatroom"},
               {anonymous, false}
              ]},
             {access_admin, muc_admin}]},
  ...
 ]}.
This module enables optional logging of Multi-User Chat (MUC) public conversations to HTML. Once you enable this module, users can join a room using a MUC capable Jabber client, and if they have enough privileges, they can request the configuration form in which they can set the option to enable room logging.
Features:
Options:
Examples:
<a href="http://www.jabber.ru/">Jabber.ru</a>.
{access, muc, [{allow, all}]}.

{modules,
 [
  ...
  {mod_muc_log, [
                 {access_log, muc},
                 {cssfile, "http://example.com/my.css"},
                 {dirtype, plain},
                 {outdir, "/var/www/muclogs"},
                 {timezone, universal},
                 {spam_prevention, true},
                 {top_link, {"http://www.jabber.ru/", "Jabber.ru"}}
                ]},
  ...
 ]}.
<a href="/">Home</a>.
{acl, admins, {user, "admin1", "example.org"}}.
{acl, admins, {user, "admin2", "example.net"}}.

{access, muc_log, [{allow, admins},
                   {deny, all}]}.

{modules,
 [
  ...
  {mod_muc_log, [
                 {access_log, muc_log},
                 {cssfile, false},
                 {dirtype, subdirs},
                 {outdir, "/var/www/muclogs"},
                 {timezone, local}
                ]},
  ...
 ]}.
This module implements offline message storage. This means that all messages sent to an offline user will be stored on the server until that user comes online again. Thus it is very similar to how email works. Note that ejabberdctl has a command to delete expired messages (see section 4.1).
This module implements Blocking Communication (also known as Privacy Rules) as defined in section 10 from XMPP IM. If end users have support for it in their Jabber client, they will be able to:
(from http://www.xmpp.org/specs/rfc3921.html#privacy)
- Retrieving one’s privacy lists.
- Adding, removing, and editing one’s privacy lists.
- Setting, changing, or declining active lists.
- Setting, changing, or declining the default list (i.e., the list that is active by default).
- Allowing or blocking messages based on JID, group, or subscription type (or globally).
- Allowing or blocking inbound presence notifications based on JID, group, or subscription type (or globally).
- Allowing or blocking outbound presence notifications based on JID, group, or subscription type (or globally).
- Allowing or blocking IQ stanzas based on JID, group, or subscription type (or globally).
- Allowing or blocking all communications based on JID, group, or subscription type (or globally).
Options:
This module adds support for Private XML Storage (XEP-0049):
Using this method, Jabber entities can store private data on the server and retrieve it whenever necessary. The data stored might be anything, as long as it is valid XML. One typical usage for this namespace is the server-side storage of client-specific preferences; another is Bookmark Storage (XEP-0048).
Options:
This module implements SOCKS5 Bytestreams (XEP-0065). It allows ejabberd to act as a file transfer proxy between two XMPP clients.
Options:
{127,0,0,1}.
Examples:
{modules,
 [
  ...
  {mod_proxy65, []},
  ...
 ]}.
{acl, proxy_users, {server, "example.org"}}.
{access, proxy65_access, [{allow, proxy_users}, {deny, all}]}.

{acl, admin, {user, "admin", "example.org"}}.
{shaper, proxyrate, {maxrate, 10240}}. %% 10 Kbytes/sec
{access, proxy65_shaper, [{none, admin}, {proxyrate, proxy_users}]}.

{modules,
 [
  ...
  {mod_proxy65, [{host, "proxy1.example.org"},
                 {name, "File Transfer Proxy"},
                 {ip, {200,150,100,1}},
                 {port, 7778},
                 {max_connections, 5},
                 {access, proxy65_access},
                 {shaper, proxy65_shaper}]},
  ...
 ]}.
This module offers a Publish-Subscribe Service (XEP-0060). The functionality in mod_pubsub can be extended using plugins. The plugin that implements PEP (Personal Eventing via Pubsub) (XEP-0163) is enabled in the default ejabberd configuration file, and it requires mod_caps.
Options:
Example:
{modules,
 [
  ...
  {mod_pubsub, [
                {access_createnode, pubsub_createnode},
                {plugins, ["default", "pep"]}
               ]}
  ...
 ]}.
This module adds support for In-Band Registration (XEP-0077). This protocol enables end users to use a Jabber client to:
Options:
\n
This module reads also another option defined globably for the server: {registration_timeout, Timeout}. This option limits the frequency of registration from a given IP or username. So, a user can’t register a new account from the same IP address or JID during this number of seconds after previous registration. Timeout is expressed in seconds, and must be an integer. To disable this limitation, instead of an integer put a word like: infinity. Default value: 600 seconds.
Examples:
{acl, shortname, {user_glob, "?"}}.
{acl, shortname, {user_glob, "??"}}.
%% The same using regexp:
%%{acl, shortname, {user_regexp, "^..?$"}}.

{access, register, [{deny, shortname},
                    {allow, all}]}.

{modules,
 [
  ...
  {mod_register, [{access, register}]},
  ...
 ]}.
{access, register, [{deny, all}]}.

{modules,
 [
  ...
  %% {mod_register, [{access, register}]},
  ...
 ]}.
{registration_timeout, 3600}.
{modules,
 [
  ...
  {mod_register,
   [
    {welcome_message, {"Welcome!", "Hi.\nWelcome to this Jabber server.\n Check http://www.jabber.org\n\nBye"}},
    {registration_watchers, ["admin1@example.org", "boss@example.net"]}
   ]},
  ...
 ]}.
This module implements roster management as defined in RFC 3921: XMPP IM.
Options:
This module adds support for logging end user packets via a Jabber message
auditing service such as
Bandersnatch. All user
packets are encapsulated in a <route/> element and sent to the specified
service(s).
Options:
Examples:
{modules,
 [
  ...
  {mod_service_log, [{loggers, ["bandersnatch.example.com"]}]},
  ...
 ]}.
{modules,
 [
  ...
  {mod_service_log, [{loggers, ["bandersnatch.example.com",
                                "bandersnatch.example.org"]}]},
  ...
 ]}.
This module enables you to create shared roster groups. This means that you can create groups of people that can see members from (other) groups in their rosters. The big advantages of this feature are that end users do not need to manually add all users to their rosters, and that they cannot permanently delete users from the shared roster groups. A shared roster group can have members from any Jabber server, but the presence will only be available from and to members of the same virtual host where the group is created.
Shared roster groups can be edited only via the Web Admin. Each group has a unique identification and the following parameters:
Examples:
Identification Group ‘club_members’ Name Club Members Description Members from the computer club Members
member1@example.org member2@example.org member3@example.org Displayed groups club_members
Identification Group ‘management’ Group ‘marketing’ Group ‘sales’ Name Management Marketing Sales Description Members
manager1@example.org manager2@example.org manager3@example.org manager4@example.org
marketeer1@example.org marketeer2@example.org marketeer3@example.org marketeer4@example.org
saleswoman1@example.org salesman1@example.org saleswoman2@example.org salesman2@example.org Displayed groups
management marketing sales
management marketing
management sales
This module adds support for Statistics Gathering (XEP-0039). This protocol allows you to retrieve next statistics from your ejabberd deployment:
Options:
As there are only a small amount of clients (for example Tkabber) and software libraries with support for this XEP, a few examples are given of the XML you need to send in order to get the statistics. Here they are:
<iq to='example.org' type='get'>
  <query xmlns='http://jabber.org/protocol/stats'>
    <stat name='users/online'/>
  </query>
</iq>
<iq to='example.org' type='get'>
  <query xmlns='http://jabber.org/protocol/stats'>
    <stat name='users/all-hosts/total'/>
  </query>
</iq>
This module features support for Entity Time (XEP-0090). By using this XEP, you are able to discover the time at another entity’s location.
Options:
This module allows end users to store and retrieve their vCard, and to retrieve other users vCards, as defined in vcard-temp (XEP-0054). The module also implements an uncomplicated Jabber User Directory based on the vCards of these users. Moreover, it enables the server to send its vCard when queried.
Options:
Examples:
{modules,
 [
  ...
  {mod_vcard, [{search, true},
               {matches, 20},
               {allow_return_all, true},
               {search_all_hosts, false}]},
  ...
 ]}.
{modules,
 [
  ...
  {mod_vcard, [{search, true},
               {matches, infinity},
               {allow_return_all, true}]},
  ...
 ]}.
ejabberd can map LDAP attributes to vCard fields. This behaviour is implemented in the mod_vcard_ldap module. This module does not depend on the authentication method (see 3.2.5).
Note that ejabberd treats LDAP as a read-only storage: it is possible to consult data, but not possible to create accounts, change password or edit vCard that is stored in LDAP.
The mod_vcard_ldap module has its own optional parameters. The first group of parameters has the same meaning as the top-level LDAP parameters to set the authentication method: ldap_servers, ldap_port, ldap_rootdn, ldap_password, ldap_base, ldap_uids, and ldap_filter. See section 3.2.5 for detailed information about these options. If one of these options is not set, ejabberd will look for the top-level option with the same name.
The second group of parameters consists of the following mod_vcard_ldap-specific options:
[{"NICKNAME", "%u", []},
 {"FN", "%s", ["displayName"]},
 {"LAST", "%s", ["sn"]},
 {"FIRST", "%s", ["givenName"]},
 {"MIDDLE", "%s", ["initials"]},
 {"ORGNAME", "%s", ["o"]},
 {"ORGUNIT", "%s", ["ou"]},
 {"CTRY", "%s", ["c"]},
 {"LOCALITY", "%s", ["l"]},
 {"STREET", "%s", ["street"]},
 {"REGION", "%s", ["st"]},
 {"PCODE", "%s", ["postalCode"]},
 {"TITLE", "%s", ["title"]},
 {"URL", "%s", ["labeleduri"]},
 {"DESC", "%s", ["description"]},
 {"TEL", "%s", ["telephoneNumber"]},
 {"EMAIL", "%s", ["mail"]},
 {"BDAY", "%s", ["birthDay"]},
 {"ROLE", "%s", ["employeeType"]},
 {"PHOTO", "%s", ["jpegPhoto"]}]
[{"User", "%u"},
 {"Full Name", "displayName"},
 {"Given Name", "givenName"},
 {"Middle Name", "initials"},
 {"Family Name", "sn"},
 {"Nickname", "%u"},
 {"Birthday", "birthDay"},
 {"Country", "c"},
 {"City", "l"},
 {"Email", "mail"},
 {"Organization Name", "o"},
 {"Organization Unit", "ou"}]
[{"Full Name", "FN"},
 {"Given Name", "FIRST"},
 {"Middle Name", "MIDDLE"},
 {"Family Name", "LAST"},
 {"Nickname", "NICKNAME"},
 {"Birthday", "BDAY"},
 {"Country", "CTRY"},
 {"City", "LOCALITY"},
 {"Email", "EMAIL"},
 {"Organization Name", "ORGNAME"},
 {"Organization Unit", "ORGUNIT"}]
Examples:
Let’s say ldap.example.org is the name of our LDAP server. We have users with their passwords in "ou=Users,dc=example,dc=org" directory. Also we have addressbook, which contains users emails and their additional infos in "ou=AddressBook,dc=example,dc=org" directory. Corresponding authentication section should looks like this:
%% authentication method
{auth_method, ldap}.
%% DNS name of our LDAP server
{ldap_servers, ["ldap.example.org"]}.
%% We want to authorize users from 'shadowAccount' object class only
{ldap_filter, "(objectClass=shadowAccount)"}.
Now we want to use users LDAP-info as their vCards. We have four attributes defined in our LDAP schema: "mail" — email address, "givenName" — first name, "sn" — second name, "birthDay" — birthday. Also we want users to search each other. Let’s see how we can set it up:
{modules,
  ...
  {mod_vcard_ldap,
   [
    %% We use the same server and port, but want to bind anonymously because
    %% our LDAP server accepts anonymous requests to
    %% "ou=AddressBook,dc=example,dc=org" subtree.
    {ldap_rootdn, ""},
    {ldap_password, ""},
    %% define the addressbook's base
    {ldap_base, "ou=AddressBook,dc=example,dc=org"},
    %% uidattr: user's part of JID is located in the "mail" attribute
    %% uidattr_format: common format for our emails
    {ldap_uids, [{"mail","%u@mail.example.org"}]},
    %% We have to define empty filter here, because entries in addressbook does not
    %% belong to shadowAccount object class
    {ldap_filter, ""},
    %% Now we want to define vCard pattern
    {ldap_vcard_map,
     [{"NICKNAME", "%u", []}, % just use user's part of JID as his nickname
      {"FIRST", "%s", ["givenName"]},
      {"LAST", "%s", ["sn"]},
      {"FN", "%s, %s", ["sn", "givenName"]}, % example: "Smith, John"
      {"EMAIL", "%s", ["mail"]},
      {"BDAY", "%s", ["birthDay"]}]},
    %% Search form
    {ldap_search_fields,
     [{"User", "%u"},
      {"Name", "givenName"},
      {"Family Name", "sn"},
      {"Email", "mail"},
      {"Birthday", "birthDay"}]},
    %% vCard fields to be reported
    %% Note that JID is always returned with search results
    {ldap_search_reported,
     [{"Full Name", "FN"},
      {"Nickname", "NICKNAME"},
      {"Birthday", "BDAY"}]}
  ]}
  ...
}.
Note that mod_vcard_ldap module checks an existence of the user before searching his info in LDAP.
{ldap_vcard_map,
 [{"NICKNAME", "%u", []},
  {"FN", "%s", ["displayName"]},
  {"CTRY", "Russia", []},
  {"EMAIL", "%u@%d", []},
  {"DESC", "%s\n%s", ["title", "description"]}
 ]},
{ldap_search_fields,
 [{"User", "uid"},
  {"Full Name", "displayName"},
  {"Email", "mail"}
 ]},
{ldap_search_reported,
 [{"Full Name", "FN"},
  {"Email", "EMAIL"},
  {"Birthday", "BDAY"},
  {"Nickname", "NICKNAME"}
 ]},
This module implements Software Version (XEP-0092). Consequently, it answers ejabberd’s version when queried.
Options:
The ejabberdctl command line administration script allows to start, stop and perform many other administrative tasks in a local or remote ejabberd server.
When ejabberdctl is executed without any parameter, it displays the available options. If there isn’t an ejabberd server running, the available parameters are:
If there is an ejabberd server running in the system, ejabberdctl shows all the available commands in that server. The more interesting ones are:
The ejabberdctl script also allows the argument --node NODENAME. This allows to administer a remote node.
The ejabberdctl script can be configured in the file ejabberdctl.cfg. This file includes detailed information about each configurable option.
The ejabberdctl script returns a numerical status code. Success is represented by 0, error is represented by 1, and other codes may be used for specifical results. This can be used by other scripts to determine automatically if a command succedded or failed, for example using: echo $?
ejabberd is an Erlang/OTP application that runs inside an Erlang runtime system. This system is configured using environment variables and command line parameters. The ejabberdctl administration script uses many of those possibilities. You can configure some of them with the file ejabberdctl.cfg, which includes detailed description about them. This section describes for reference purposes all the environment variables and command line parameters.
The environment variables:
The command line parameters:
Note that some characters need to be escaped when used in shell scripts, for instance " and {}.
You can find other options in the Erlang manual page (erl -man erl).
The ejabberd Web Admin allows to administer most of ejabberd using a web browser.
This feature is enabled by default:
a ejabberd_http listener with the option web_admin (see
section 3.1.3) is included in the listening ports. Then you can open
http://server:port/admin/ in your favourite web browser. You
will be asked to enter the username (the full Jabber ID) and password
of an ejabberd user with administrator rights. After authentication
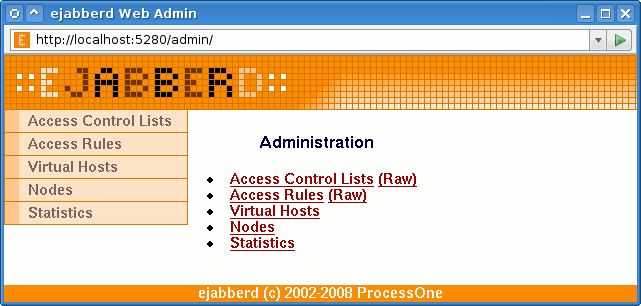
you will see a page similar to figure 4.1.
Here you can edit access restrictions, manage users, create backups, manage the database, enable/disable ports listened for, view server statistics,…
Examples:
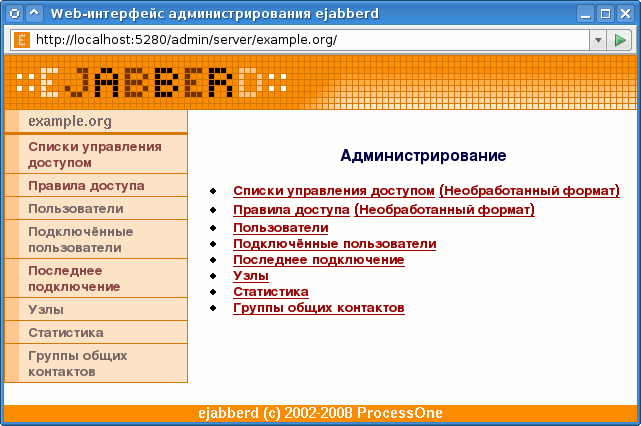
http://example.org:5280/admin/ to
administer all virtual hosts or to
http://example.org:5280/admin/server/example.com/ to administer only
the virtual host example.com. Before you get access to the Web Admin
you need to enter as username, the JID and password from a registered user
that is allowed to configure ejabberd. In this example you can enter as
username ‘admin@example.net’ to administer all virtual hosts (first
URL). If you log in with ‘admin@example.com’ onhttp://example.org:5280/admin/server/example.com/ you can only
administer the virtual host example.com.
{acl, admins, {user, "admin", "example.net"}}.
{host_config, "example.com", [{acl, admins, {user, "admin", "example.com"}}]}.
{access, configure, [{allow, admins}]}.

{hosts, ["example.org"]}.

{listen,
 [
  ...
  {5280, ejabberd_http, [http_poll, web_admin]},
  ...
 ]}.
https://192.168.1.1:5280/admin/:
{hosts, ["example.org"]}.

{listen,
 [
  ...
  {5270, ejabberd_http,    [http_poll]},
  {5280, ejabberd_http,    [web_admin, {ip, {192, 168, 1, 1}},
                            tls, {certfile, "/usr/local/etc/server.pem"}]},
  ...
 ]}.
If you enable mod_configure and mod_adhoc, you can perform several administrative tasks in ejabberd with a Jabber client. The client must support Ad-Hoc Commands (XEP-0050), and you must login in the Jabber server with an account with proper privileges.
ejabberd uses the distributed Mnesia database. Being distributed, Mnesia enforces consistency of its file, so it stores the name of the Erlang node in it (see section 5.4). The name of an Erlang node includes the hostname of the computer. So, the name of the Erlang node changes if you change the name of the machine in which ejabberd runs, or when you move ejabberd to a different machine.
So, if you want to change the computer hostname where ejabberd is installed, you must follow these instructions:
ejabberdctl backup /tmp/ejabberd-oldhost.backup
ejabberdctl restore /tmp/ejabberd-oldhost.backup
You need to take the following TCP ports in mind when configuring your firewall:
Port Description 5222 Standard port for Jabber/XMPP client connections, plain or STARTTLS. 5223 Standard port for Jabber client connections using the old SSL method. 5269 Standard port for Jabber/XMPP server connections. 4369 Port used by EPMD for communication between Erlang nodes. port range Used for connections between Erlang nodes. This range is configurable.
epmd (Erlang Port Mapper Daemon) is a small name server included in Erlang/OTP and used by Erlang programs when establishing distributed Erlang communications. ejabberd needs epmd to use ejabberdctl and also when clustering ejabberd nodes. This small program is automatically started by Erlang, and is never stopped. If ejabberd is stopped, and there aren’t any other Erlang programs running in the system, you can safely stop epmd if you want.
ejabberd runs inside an Erlang node. To communicate with ejabberd, the script ejabberdctl starts a new Erlang node and connects to the Erlang node that holds ejabberd. In order for this communication to work, epmd must be running and listening for name requests in the port 4369. You should block the port 4369 in the firewall, so only the programs in your machine can access it.
If you build a cluster of several ejabberd instances, each ejabberd instance is called an ejabberd node. Those ejabberd nodes use a special Erlang communication method to build the cluster, and EPMD is again needed listening in the port 4369. So, if you plan to build a cluster of ejabberd nodes you must open the port 4369 for the machines involved in the cluster. Remember to block the port so Internet doesn’t have access to it.
Once an Erlang node solved the node name of another Erlang node using EPMD and port 4369, the nodes communicate directly. The ports used in this case are random. You can limit the range of ports when starting Erlang with a command-line parameter, for example:
erl ... -kernel inet_dist_listen_min 4370 inet_dist_listen_max 4375
The Erlang cookie is a string with numbers and letters. An Erlang node reads the cookie at startup from the command-line parameter -setcookie. If not indicated, the cookie is read from the cookie file $HOME/.erlang.cookie. If this file does not exist, it is created immediately with a random cookie. Two Erlang nodes communicate only if they have the same cookie. Setting a cookie on the Erlang node allows you to structure your Erlang network and define which nodes are allowed to connect to which.
Thanks to Erlang cookies, you can prevent access to the Erlang node by mistake, for example when there are several Erlang nodes running different programs in the same machine.
Setting a secret cookie is a simple method to difficult unauthorized access to your Erlang node. However, the cookie system is not ultimately effective to prevent unauthorized access or intrusion to an Erlang node. The communication between Erlang nodes are not encrypted, so the cookie could be read sniffing the traffic on the network. The recommended way to secure the Erlang node is to block the port 4369.
An Erlang node may have a node name. The name can be short (if indicated with the command-line parameter -sname) or long (if indicated with the parameter -name). Starting an Erlang node with -sname limits the communication between Erlang nodes to the LAN.
Using the option -sname instead of -name is a simple method to difficult unauthorized access to your Erlang node. However, it is not ultimately effective to prevent access to the Erlang node, because it may be possible to fake the fact that you are on another network using a modified version of Erlang epmd. The recommended way to secure the Erlang node is to block the port 4369.
ejabberd stores sensible data in the file system either in plain text or binary files. The file system permissions should be set to only allow the proper user to read, write and execute those files and directories.
A Jabber domain is served by one or more ejabberd nodes. These nodes can be run on different machines that are connected via a network. They all must have the ability to connect to port 4369 of all another nodes, and must have the same magic cookie (see Erlang/OTP documentation, in other words the file ~ejabberd/.erlang.cookie must be the same on all nodes). This is needed because all nodes exchange information about connected users, s2s connections, registered services, etc…
Each ejabberd node has the following modules:
This module is the main router of Jabber packets on each node. It routes them based on their destination’s domains. It uses a global routing table. The domain of the packet’s destination is searched in the routing table, and if it is found, the packet is routed to the appropriate process. If not, it is sent to the s2s manager.
This module routes packets which have a destination domain equal to one of this server’s host names. If the destination JID has a non-empty user part, it is routed to the session manager, otherwise it is processed depending on its content.
This module routes packets to local users. It looks up to which user resource a packet must be sent via a presence table. Then the packet is either routed to the appropriate c2s process, or stored in offline storage, or bounced back.
This module routes packets to other Jabber servers. First, it checks if an opened s2s connection from the domain of the packet’s source to the domain of the packet’s destination exists. If that is the case, the s2s manager routes the packet to the process serving this connection, otherwise a new connection is opened.
Suppose you already configured ejabberd on one machine named (first), and you need to setup another one to make an ejabberd cluster. Then do following steps:
~ejabberd/.erlang.cookie file from first to
second.(alt) You can also add ‘-cookie content_of_.erlang.cookie’
option to all ‘erl’ commands below.
erl -sname ejabberd \
    -mnesia dir "/var/lib/ejabberd/" \
    -mnesia extra_db_nodes "['ejabberd@first']" \
    -s mnesia
This will start Mnesia serving the same database as ejabberd@first.
You can check this by running the command ‘mnesia:info().’. You
should see a lot of remote tables and a line like the following:
Note: the Mnesia directory may be different in your system. To know where does ejabberd expect Mnesia to be installed by default, call 4.1 without options and it will show some help, including the Mnesia database spool dir.
running db nodes = [ejabberd@first, ejabberd@second]
mnesia:change_table_copy_type(schema, node(), disc_copies).
This will create local disc storage for the database.
(alt) Change storage type of the scheme table to ‘RAM and disc copy’ on the second node via the Web Admin.
mnesia:add_table_copy’ or
‘mnesia:change_table_copy_type’ as above (just replace
‘schema’ with another table name and ‘disc_copies’
can be replaced with ‘ram_copies’ or
‘disc_only_copies’).Which tables to replicate is very dependant on your needs, you can get
some hints from the command ‘mnesia:info().’, by looking at the
size of tables and the default storage type for each table on ’first’.
Replicating a table makes lookups in this table faster on this node. Writing, on the other hand, will be slower. And of course if machine with one of the replicas is down, other replicas will be used.
Also section 5.3 (Table Fragmentation) of Mnesia User’s Guide can be helpful.
(alt) Same as in previous item, but for other tables.
init:stop().’ or just ‘q().’ to exit from
the Erlang shell. This probably can take some time if Mnesia has not yet
transfered and processed all data it needed from first.acl’
and ‘access’ options — they will be taken from
first, and mod_muc and mod_irc should be
enabled only on one machine in the cluster).
You can repeat these steps for other machines supposed to serve this domain.
ejabberd includes an algorithm to load balance the components that are plugged on an ejabberd cluster. It means that you can plug one or several instances of the same component on each ejabberd cluster and that the traffic will be automatically distributed.
The default distribution algorithm try to deliver to a local instance of a component. If several local instances are available, one instance is chosen randomly. If no instance is available locally, one instance is chosen randomly among the remote component instances.
If you need a different behaviour, you can change the load balancing behaviour with the option domain_balancing. The syntax of the option is the following:
{domain_balancing, "component.example.com", <balancing_criterium>}.
Several balancing criteria are available:
If the value corresponding to the criteria is the same, the same component instance in the cluster will be used.
When there is a risk of failure for a given component, domain balancing can cause service trouble. If one component is failing the service will not work correctly unless the sessions are rebalanced.
In this case, it is best to limit the problem to the sessions handled by the failing component. This is what the domain_balancing_component_number option does, making the load balancing algorithm not dynamic, but sticky on a fix number of component instances.
The syntax is the following:
{domain_balancing_component_number, "component.example.com", N}
An ejabberd node writes two log files:
The option loglevel modifies the verbosity of the file ejabberd.log. The possible levels are:
For example, the default configuration is:
{loglevel, 4}.
The log files grow continually, so it is recommended to rotate them periodically. To rotate the log files, rename the files and then reopen them. The ejabberd command reopen-log (please refer to section 4.1.1) reopens the log files, and also renames the old ones if you didn’t rename them.
The Debug Console is an Erlang shell attached to an already running ejabberd server. With this Erlang shell, an experienced administrator can perform complex tasks.
This shell gives complete control over the ejabberd server, so it is important to use it with extremely care. There are some simple and safe examples in the article Interconnecting Erlang Nodes
To exit the shell, close the window or press the keys: control+c control+c.
ejabberd includes a watchdog mechanism that may be useful to developers when troubleshooting a problem related to memory usage. If a process in the ejabberd server consumes a lot of memory, a message is sent to the Jabber accounts defined with the option watchdog_admins in the ejabberd configuration file. Note that the threshold to define what is too much memory usage is only configurable editing the source code. Example configuration:
{watchdog_admins, ["admin2@localhost", "admin2@example.org"]}.
To remove watchdog admins, remove them in the option. To remove all watchdog admins, set the option with an empty list:
{watchdog_admins, []}.
All built-in modules support the xml:lang attribute inside IQ queries. Figure A.1, for example, shows the reply to the following query:
<iq id='5'
    to='example.org'
    type='get'
    xml:lang='ru'>
  <query xmlns='http://jabber.org/protocol/disco#items'/>
</iq>
The Web Admin also supports the Accept-Language HTTP header.
Release notes are available from ejabberd Home Page
Thanks to all people who contributed to this guide:
Ejabberd Installation and Operation Guide.
Copyright © 2003 — 2008 ProcessOne
This document is free software; you can redistribute it and/or modify it under the terms of the GNU General Public License as published by the Free Software Foundation; either version 2 of the License, or (at your option) any later version.
This document is distributed in the hope that it will be useful, but WITHOUT ANY WARRANTY; without even the implied warranty of MERCHANTABILITY or FITNESS FOR A PARTICULAR PURPOSE. See the GNU General Public License for more details.
You should have received a copy of the GNU General Public License along with this document; if not, write to the Free Software Foundation, Inc., 51 Franklin Street, Fifth Floor, Boston, MA 02110-1301, USA.
This document was translated from LATEX by HEVEA.